|
Overview
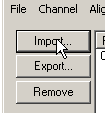
The Udicus File Manager allows you to import channel-based data files
of the supported format and export them to any other. Udicus currently
supports data file formats from VitalView (ASCII text file), ClockLab
and Somnologica, and the Universal Data Channel Storage (UDCS), which
Udicus is based on. The temporal alignment feature of Udicus allows
you to combine several channels and make them seem as if they started
and ended at the same time by cutting or zero-padding the channel data,
which can be helpful if you are recording from the same subject with
several programs/devices.
Before Data Collection
Before you get started collecting data that will eventually be used
by the File Manager, each recording computer must be synchronized
in order to keep the recorded data channels consistent when combining
them for later analysis. There exist plenty of tools that set the computer
clock to a tenth of a second precision or better. Our recommendation
is the time-sync utility called Dimension 4
available here. The tool is distributed as freeware, and it works
well with Windows 98 and 2000.
If you intend to look at data from different recording programs in a
single program it is good practice to start and end your recordings
at relatively similar times. The temporal alignment functions will align
the data channels so that post-processing programs will interpret the
two channels to have started the recording at the same time, yet it
would be scientifically sound to throw out all the data that was recorded
when not all channels were recorded. If you have the hard drive space,
it is a good idea to choose a high sampling rate for each recording,
because that will also improve the accuracy of the alignment function.
The alignment function may have to shift the signals in time by up to
half the sampling interval (see Developer’s Manual for details), so
large sampling rates help reduce this error.
Importing Files
Now that all of the recording computers have been synchronized and an
adequate sampling rate has been chosen, you can begin data collection.
You should only use Udicus on complete data files, so do not use it
on files that you are still recording to. If you must look at data you're
still recording to, refer to the tips and tricks section.
 Once you have a file
that you want to visualize in another system, open up the File Manager
and click the import button located on the left-hand side of the window
or you can choose import from the file menu. Any file you want to import
must have one of the following extensions: wpi, asc, clb, or emb, which
represent UDCS, Once you have a file
that you want to visualize in another system, open up the File Manager
and click the import button located on the left-hand side of the window
or you can choose import from the file menu. Any file you want to import
must have one of the following extensions: wpi, asc, clb, or emb, which
represent UDCS,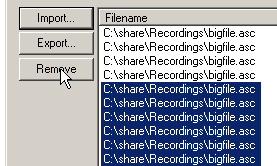 VitalView,
Clocklab and Embla respectively. VitalView,
Clocklab and Embla respectively.
Once one or more files have been imported, you can remove any channels
from the list that you do not wish to export into a different file format.
You can do this by highlighting/selecting all channels you do not want
to export, then clicking on the remove button on the left-hand side
of the window or choosing the remove option from the channel menu option.
Aligning Files
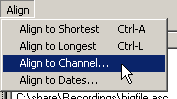 If you've imported
several files that start and end at different times, some post processing
programs may require that channels be aligned, so that they seem to
have started and ended recording at the same moment. There are four
different options for aligning the data: align to longest, align to
shortest, align to channel, and align to dates. These options can be
chosen from the align menu. If you've imported
several files that start and end at different times, some post processing
programs may require that channels be aligned, so that they seem to
have started and ended recording at the same moment. There are four
different options for aligning the data: align to longest, align to
shortest, align to channel, and align to dates. These options can be
chosen from the align menu.
Align to longest: This option automatically determines the absolute
earliest start time and the absolute latest end time, then pads any
signal that begins after and ends prior to the selected start and end
times with zeros that are explicitly labeled as invalid in the UDCS
file format.
Align to shortest: This option automatically determines the absolute
latest start time and the absolute earliest end time, then cuts any
signal that begins before and ends after to the selected start and end
times. This option is useful when you only want to use data recorded
during times in which all channel were being recorded.
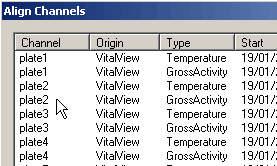 Align to channel:
This option allows you to choose a specific channel of data to align
to. A dialog window allows you to select one of the channels. Any signal
that is longer than the chosen signal is truncated to fit the shorter
length and any signal that is shorter than the chosen signal is padded
with zeros, which are again marked as invalid to match the length of
the chosen signal. Align to channel:
This option allows you to choose a specific channel of data to align
to. A dialog window allows you to select one of the channels. Any signal
that is longer than the chosen signal is truncated to fit the shorter
length and any signal that is shorter than the chosen signal is padded
with zeros, which are again marked as invalid to match the length of
the chosen signal.
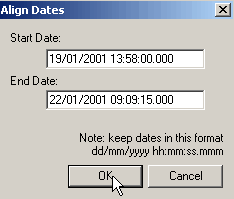 Align to dates:
This option allows you to choose a start and end date for all signals.
A dialog window allows you to specify exactly the start and end dates.
The signals will then be padded or truncated accordingly depending on
whether they begin before or after the start date and whether they end
before or after the end date. Note that the format of the date needs
to be kept precisely as displayed. Align to dates:
This option allows you to choose a start and end date for all signals.
A dialog window allows you to specify exactly the start and end dates.
The signals will then be padded or truncated accordingly depending on
whether they begin before or after the start date and whether they end
before or after the end date. Note that the format of the date needs
to be kept precisely as displayed.
Exporting Files
Once you have imported the file and aligned the signals of the channels
you chose you are ready to export. You can now choose the export button
on the left-hand side of the window or you may choose this option from
the file menu. Once you choose this option, a window appears and you
must choose the file format you wish to export in. You may export into
Somnologica, ClockLab, or UDCS.
If you choose to export into Somnologica each channel becomes a separate
file. You cannot open this file directly in Somnologica you must first
open it into a workpad and from there you can choose the add trace option
from the data menu.
|